Getting an HTTPS certificate for your website is not anymore an optional choice. If you are a website developer, you might know that Google has already declared that those who have an SSL certificate into their website will get privileges to rank their website in the google search engine rank. Moreover, getting an SSL certificate makes your website secure, invulnerable, and trustworthy to the visitors. Now, there are many certification authorities to give your website an SSL certificate; the confusion is, which one should you use? While speaking of the SSL certificate, Let’s Encrypt is the most popular and free certification authority to grant your website an SSL certificate and make it secure. You can install and run the Let’s Encrypt on Linux and any other platforms.
Let’s Encrypt (Certbot) on Linux
When you visit any website, you should see a symbol that symbolizes whether the site is secure or not at the top left corner of the address bar. Of course, as a heedful user or consumer, you won’t provide your personal information on an insecure website.
Now, as a website developer or owner, it’s our duty to make the site secure and trustworthy. Here comes the SSL certification method. Let’s Encrypt uses the Certbot technology to automatically detect your server and system type and offer you the best method to secure your site. You can use the Let’s Encrypt Certbot method either to secure only one site or to secure all the sites that are running under the particular server.
I must clear one thing: getting an SSL certificate only makes your website encrypted; there is no guarantee that a good hacker can’t hack you. Moreover, SSL also can’t protect your site from DDOS attacks. If you run your websites on a load-balancer server, I will suggest you get an SSL load balancer.

You can secure your website, server, SMTP email server, POPS, and IMAP server through the Certbot method of Let’s Encrypt on Linux. The Certbot originally doesn’t change anything from your WebHost database. It just adds configurations inside the .htaccess file in your file manager. In this post, we will learn how to install and configure the Let’s Encrypt (Certbot) on various Linux distributions.
1. Install Let’s Encrypt on Ubuntu and Debian Linux
If you are a web host manager, you might already know that Ubuntu powers most servers and websites in the world. So, it is important to know how to get an SSL certificate for your site on Ubuntu Linux. As the Let’s Encrypt (Certbot) is offering a free SSL certificate for our site, so here, we will see how to install the Let’s Encrypt on Ubuntu Linux.
Installing the Let’s Encrypt (Certbot) on Ubuntu and other Debian distributions are pretty straight forward. There are only two simple steps to install the Certbot on your system. They are: install the Certbot on your machine and configure it with your server.
Step 1: Install Certbot On Ubuntu Linux
Here, we will be using the Snap package manager to install the Certbot tool on our system. If you don’t have the Snap installed inside your system, first install the Snapd on your machine.
sudo apt update
sudo apt install snapd
sudo snap install snap-store
Now, run the following Snap command to install the classic Certbot on your Ubuntu Linux. I must mention that, by installing the Certbot classic, you are actually installing the entire Let’s Encrypt tool on your Debian system. The download won’t take much time.
sudo snap install --classic certbot

Step 2: Configure the Certbot on Ubuntu Linux
As the installation of the Certbot is done on our Ubuntu machine, we will now see how you can configure the Let’s Encrypt tool with your server. Here, I will show how you can configure the Certbot with the Apache and the Nginx server.
sudo certbot --apache
sudo certbot --nginx

Those who have a different server than Apache and Nginx can directly configure the Certbot setting with their server’s root directory.
sudo certbot certonly --webroot
Those who have their own server can run the following command-line to configure the Certbot with the standalone server.
sudo certbot certonly --standalone
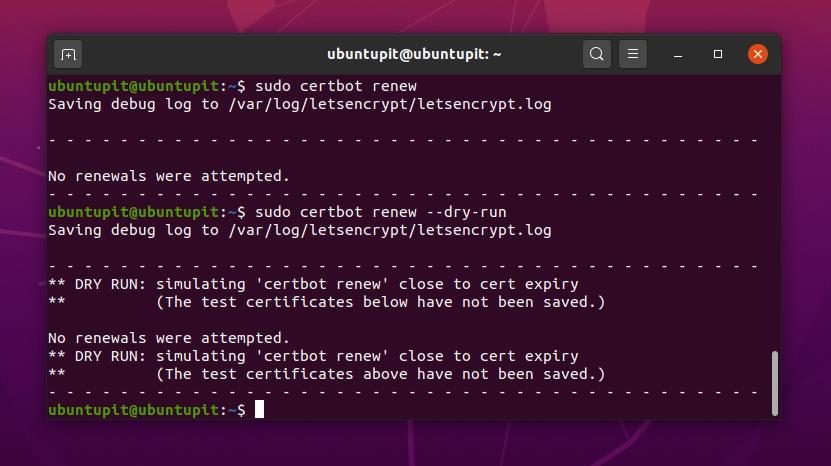
Now, we will see how you can renew the Certbot tool on your Ubuntu Linux.
sudo certbot renew
You can also run a test to check how the Certbot is performing on your server. You can run the following command-line given below and monitor the result of the ongoing dry run test.
sudo certbot renew --dry-run

2. Install Let’s Encrypt (Certbot) on Fedora Linux
Here, we will learn how to install Let’s Encrypt (Certbot) on Fedora, CentOS, and other Linux distributions that use the DNF command to manage packages. Though we can use the YUM command to install Certbot on Fedora, we will see the use of YUM commands later in the next method.
Step 1: Install EPEL on Fedora
As the DNF command is not as powerful as the YUM command, so to use the DNF command to install the Certbot on Fedora, we need to download some additional packages on our system. First, we will install the Extra Packages for Enterprise Linux (EPEL) packages on our Fedora Linux.
First, update your system repository, then run the following command-lines given below chronologically to install the EPEL packages and enable the power tools on your Fedora Linux.
sudo dnf update -y
dnf install https://dl.fedoraproject.org/pub/epel/epel-release-latest-8.noarch.rpm
sudo yum install -y httpd mod_ssl
dnf config-manager --set-enabled PowerTools
Step 2: Install CertBot on Different Servers on Fedora Linux
As we have already made our Fedora environment appropriate for installing the Certbot, we will now install the Let’s Encrypt (Certbot) on our server system. Now, run the following DNF command given below to install the Certbot on your Apache server.
I must mention that, as we used the DNF command and did little settings to set up the environment, the following command-line will also be executable on older versions of Fedora Linux and CentOS.
dnf install certbot python3-certbot-apache

Run the following DNF command on your Linux terminal to install the Let’s Encrypt (Certbot) on the Nginx server.
dnf install certbot python3-certbot-nginx
After the installation of Certbot is done, you can now check the version of Certbot on your Linux to ensure that the tool is installed successfully.
certbot --version
3. Install Let’s Encrypt on RedHat
Previously, we have seen how to install the Let’s Encrypt (Certbot) on Fedora Linux by using the DNF command. Here, we will use the YUM command tool to install the Let’s Encrypt package on the Red Hat Linux system.
First, run the following YUM command given below to install the hypertext transfer protocol and the modified version of SSL on your Linux system.
yum install -y httpd mod_ssl

Now, run the following cURL command to get the Certbot on your Linux system.
curl -O https://dl.eff.org/certbot-auto
Then run the MV command given below to move the Certbot to the /usr/local/bin/ directory.
mv certbot-auto /usr/local/bin/certbot-auto
If you get any permission error, you can run the following change mode command to get the root access.
chmod 0755 /usr/local/bin/certbot-auto
Here, we will create a virtual-host server on our Red Hat Linux system to demonstrate how the Certbot tool works on Red Hat Linux. In that case, we will use the www.bytesbuzz.com domain. Now, run the following command-line given below to edit the Certbot script.
sudo nano /etc/httpd/conf.d/www.bytesbuzz.com.conf
Once the script is opened, copy and paste the following script lines into the file. Then save and exit the script file.
<VirtualHost *:80>
ServerName www.bytesbuzz.com
ServerAlias www.bytesbuzz.com
DocumentRoot /var/www/www.bytesbuzz.com

<Directory /var/www/www.bytesbuzz.com>
Options -Indexes +FollowSymLinks
AllowOverride All
</Directory>

ErrorLog /var/log/httpd/www.bytesbuzz.com-error.log
CustomLog /var/log/httpd/www.bytesbuzz.com-access.log combined
</VirtualHost>

Now, run the following make directory command to create a directory for your domain.
mkdir -p /var/www/www.bytesbuzz.com
Then put the following echo line at the bottom of the root directory of your domain. Now, run the Chown command to get access to the domain directory.
echo "This is a test site @ www.bytesbuzz.com" > /var/www/www.bytesbuzz.com/index.html
chown -R apache:apache /var/www/www.bytesbuzz.com
Finally, run the following command-lines given below to restart the server and configure the Certbot with your server.
systemctl restart httpd
yum install -y bind-utils
/usr/local/bin/certbot-auto --apache
If you are comfortable with the Snap package manager, you can also install the Certbot tool on your Red Hat Linux by the Snap package manager.
4. Install Let’s Encrypt (Certbot) on Arch Linux
As Arch has several Linux distributions, here, we will cover the two major methods of how you can install the Let’s Encrypt (Certbot ) on Arch-based Linux distributions. Except for some minor changes, all the methods will be pretty the same for all Arch distributions. You can follow the most suitable method to install the Let’s Encrypt for your Arch Linux system.
Method 1: Install the Certbot Via GIT
As Git is always recognized as a source code repository for Linux and other systems, we will now see how we can install the Let’s Encrypt (Certbot) on Arch Linux from source code. The advantage of installing packages from source code is that you know which scripts and packages you will run on your system.
Step 1: Install Classic Certbot on Arch Linux
Installing a package by cloning Git is presumably the most efficient way to install any Linux system package. In this step, we will use the GIT package repositories and clone the Snapd.git on your system. Then we will run a system control command to enable the Snap package manager on Arch Linux. Run the following command-lines chronologically to clone Git and enable the Snapd socket on your system.
$ git clone https://aur.archlinux.org/snapd.git
$ cd snapd
$ makepkg -si
$ sudo systemctl enable --now snapd.socket
$ sudo ln -s /var/lib/snapd/snap /snap
Now, run the following Snap commands to install and refresh the Snap package manager.
sudo snap install core
sudo snap refresh core

Now, run the following command-lines given below to install the classic Certbot inside your Arch Linux system.
sudo snap install --classic certbot
sudo ln -s /snap/bin/certbot /usr/bin/certbot
Step 2: Configure Certbot with Servers
Now, in this step, we will configure the Certbot with several web-servers. Here, we are going to configure the Certbot with the Apache server and the Nginx server.
Run this command to configure the Certbot with the Apache server.
sudo certbot --apache
sudo certbot certonly --apache
Run this command to configure the Certbot with the Nginx server.
sudo certbot --nginx

Method 2: Manually Install the Certbot On Arch
In this method, we will use the most ancient method of installing packages on any system. We will download the Certbot package on our Arch Linux; then, we will install it manually. You can use this link to download the compressed version of the Certbot.

Once the download is finished, you can find the file inside the directory where you stored the file. In my case, the file is downloaded inside the Downloads directory. Now, run the following terminal command-lines given below to install the Certbot manually on your Arch Linux system.
cd Downloads/
ls
sudo pacman -U certbot-1.9.0-1-any.pkg.tar.zst

If you are still more curious about the Let’s Encrypt (Certbot) tool, here you can find the other Certbot packages for Arch Linux.
5. Install Certbot on SuSE Linux
Installing Let’s Encrypt (Certbot) on SuSE and OpenSuSE Linux is similar to installing it on Linux distributions. First, you need to install the Sanpd on your system. Then we will use the Snap commands to install the Certbot on SuSE Linux.
Step 1: Install Snap on SuSE Linux
To install the Snapd on our SuSE Linux, we will use the following zypper command-lines given below. First, run the zypper command given below to download the Snap package from the OpenSuSE Linux repository.
$ sudo zypper addrepo --refresh https://download.opensuse.org/repositories/system:/snappy/openSUSE_Leap_15.2 snappy
Then run the following GPG command given below to add the GNU Privacy Guard key.
$ sudo zypper --gpg-auto-import-keys refresh
Finally, run the following zypper command-lines given below to install the Snap package on your SuSE Linux.
$ sudo zypper dup --from snappy
$ sudo zypper install snapd
Now, run the system control commands given below to activate and enable the Snap tool on your Linux system.
$ sudo systemctl enable --now snapd
$ sudo systemctl enable --now snapd.apparmor
Step 2: Install Certbot on SuSE Linux
As we have installed the Snap tool successfully on our SuSE Linux, we can now install the Certbot tool on our system through the Snap tool. Run the Snap commands given below to install the Let’s Encrypt (Certbot Classic) on your SuSE Linux system.
sudo snap install core
sudo snap refresh core
sudo snap install --classic certbot
Now, run the following Snap commands given below to configure the Certbot tool with your Apache PHP server.
sudo ln -s /snap/bin/certbot /usr/bin/certbot
sudo certbot --apache
In the same way, you can also configure the Certbot for the Nginx PHP server.
sudo certbot --nginx
Remove Certbot From Linux
Till now, we have seen how you can install and configure the Let’s Encrypt (Certbot) on various Linux distributions. Once the Certbot is installed on your system and you have got the SSL certificate, you don’t need to keep the Certbot package installed inside your system. There are some methods that you can run on your Linux terminal shell to remove the Let’s Encrypt (Certbot) from your system.
Remove Certbot From Debian/Ubuntu
sudo apt-get remove certbot
Remove Certbot from Fedora and CentOS
sudo dnf remove certbot
Remove Certbot from Red Hat Linux
sudo yum remove certbot
Remove Certbot from Arch Linux
sudo pacman -R certbot
Extra Tips – 1: Apache VirtualHost SSL Configuration
If you are trying to install an Apache PHP server on a virtually hosted location, you might need to secure that site as well. You can install and configure any virtually hosted Apache PHP server by Let’s Encrypt. You can find the script inside the filesystem of your virtual hosting service. You need to find the configuration script of the SSL certificate and paste the following script lines inside the configuration script.
<VirtualHost *:443>
ServerName www.example.com
ServerAlias www.example.com
SSLEngine on
SSLCertificateFile "/etc/letsencrypt/live/www.example.com/cert.pem"
SSLCertificateKeyFile "/etc/letsencrypt/live/www.example.com/privkey.pem"
SSLCertificateChainFile "/etc/letsencrypt/live/www.example.com/chain.pem"
DocumentRoot /var/www/html/example
<Directory /var/www/html/example>
AllowOverride All
</Directory>
</VirtualHost>
<VirtualHost *:80>
ServerName www.example.com
Redirect / https://www.example.com/
</VirtualHost>
Extra Tips – 2: Select Desired Server Among Many Servers
If you have two web servers installed inside your Linux system, you can prefer either of them to install the Let’s Encrypt (Certbot) on your machine. If you are using a Linux system, run the following command-line given below to select your server and continue with the conventional method of getting an SSL certificate for your domain. The encryption logs will be stored inside the /var/log/letsencrypt/letsencrypt.log directory.
sudo certbot

Final Thoughts
The Certbot was created by the Electronic Frontier Foundation (EFF) to provide an SSL certificate for every website. Using the Certbot on any Linux distribution is easy; it doesn’t require much more programming skills. You just need to know a few primary terminal commands. If you are running a small or medium-sized website, you can make the site secure using the Let’s Encrypt (Certbot) method.
Before installing the Let’s Encrypt on your Linux system, you need to ensure that the Certbot is enough to secure your website. In the entire post, I have described a few methods on how you can install the Let’s Encrypt on your Linux distribution. You can also install the Certbot on your HAproxy, Plesk, and any other web hosting product. I have also narrated the usefulness of having an SSL certificate on your site.
Please share it with your friends and the Linux community if you find this post useful and helpful. You can also write down your opinions regarding this post in the comment section.


