From plenty of features of Google sheets, inserting a text box is one of them. Now, the question is, why do you need to insert a text box in your Google sheets? The answer is quite simple, and that is to highlight certain areas and make your sheet visually attractive.
Usually, Google sheets are used for numbers or texts, but sometimes you might need to specify any cells by writing something to draw your audience’s attention. However, if you have any long text to insert in your cell, then the text box can help you out there. Just simply create a text box and insert your text there to draw attention.
From start to end, I’ll let you know how to insert text boxes in Google sheets in different ways. When the tutorial completes, you’ll get familiar with the process of how to call attention to any specific areas in your Google sheets.
1. How to Insert a Text Box in Google Sheets
Inserting a text box in Google sheets is a piece of cake. You just need to follow some basic steps for doing so. Let’s dive into those steps and get all things easily.
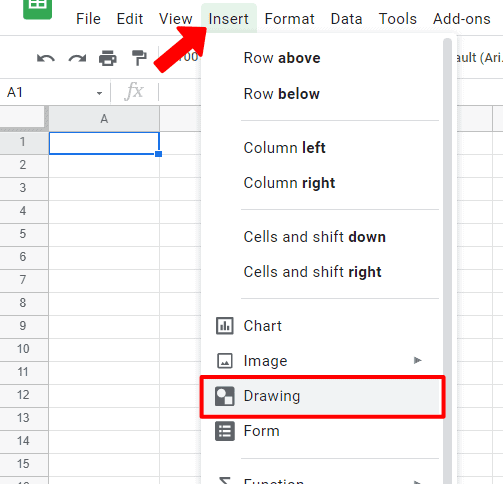
Step 1: Open your Google sheets and hover over the Insert menu from the top. Click on it and look for the Drawing section from the resulting option. Once you find the Drawing, click on it to go to the next step.
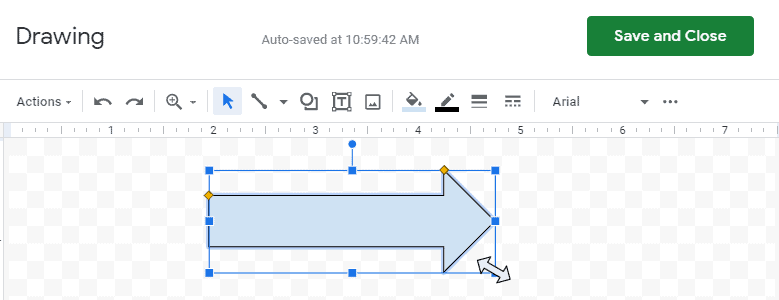
Step 2: In this step, you’ll find different options to insert text boxes in Google sheets. For instance, you’ll find Text Box (2nd from the right), Shape Icon (3rd from the right) options to insert your preferred text box.
However, if you select the text box icon, a rectangular shape will create on your canvas. On the other hand, if you would like different shapes to display your text box, then select shape as I did below.
![]()
After selecting the shapes icon, 4 options will open for you- Shapes, Arrows, Callouts, Equation. Choose your preferred one from the submenus and select to insert the text box in your Google sheets.
Step 3: Once you select your preferred options, your cursor will turn into a black cross. It indicates that you can now draw your text box shape. Well, adjust your text box size by clicking and dragging it on the canvas.
2. Format and Remove a Text Box in Your Google Sheets
So far, you’ve seen how to insert a text box in Google sheets. Now let’s come to the customization part and how you can delete/remove permanently from your sheets. Here’s also; you just need to know some basic steps as well.
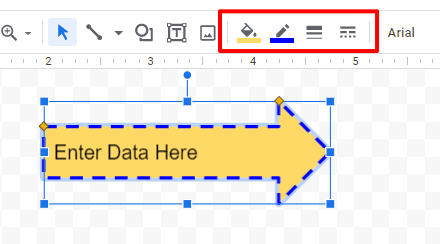
Step 1: Once you get your text box in your Google sheets, you can customize many things to make that more visually attractive. For instance, let’s customize the border style and color of your text box. And for doing so, use the below-marked toolbar at the top.
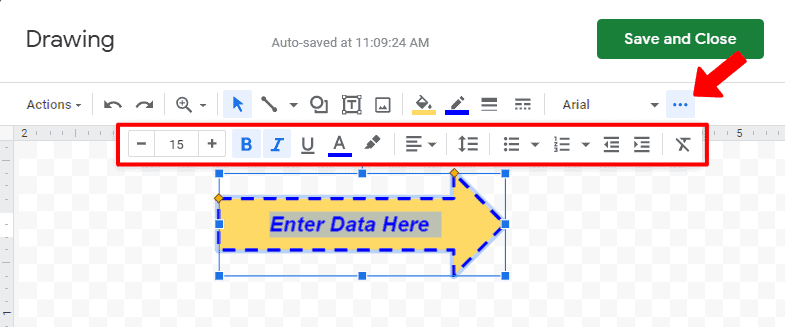
Step 2: Not just color and border style; you can change the font, font size, font type, text alignment, and many more in your text box. However, you might not be seeing these options initially but for getting so, click on 3 dots at the top right corner.
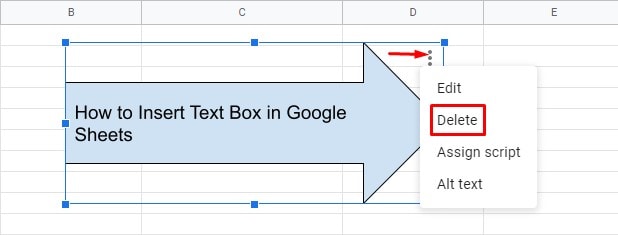
Step 3: Up to this step, you come to to the whole process, right? Now, what if you want to remove/delete the text box that you’ve created? Simply double-click on the box, and you’ll find the 3 dots at the top right corner. Click on the remove the box by tapping on Delete.
3. Run a Script Using Text Box in Google Sheets
You would be amazed to know that there’s an option to run a script on the text box that you’ve created. And then, you can just click on it, and the Google Apps script will run instantly.
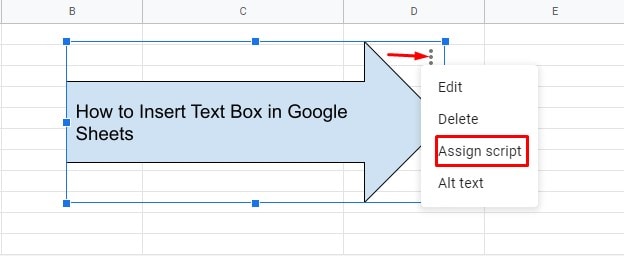
Step 1: At first, click the text box and after that 3 dots at the top right corner and finally choose Assign script from the resulting options.
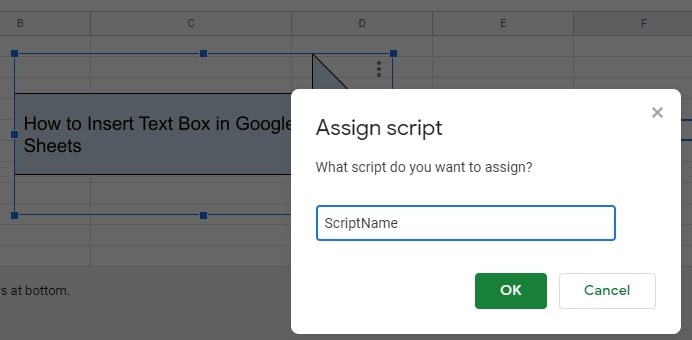
Step 2: In this section, just name the script that you want to assign and click Ok. Here the process is finally completed.
Closing Statement
Well, that’s how it completes. From now on, you can easily create text boxes to call attention to certain areas or add visual interest to your sheets. However, formating as you like and removing also is as easy as pie. Just follow the above steps.
I hope you find it helpful. If so, then don’t hesitate to leave a comment in the comment box below. That would be very much appreciated for me. Additionally, if you’re familiar with any other process of doing this, please let me know.
I am taking leave now. Stay happy and healthy! And will be back soon with another Google app trick and tips. Till then, take care of yourself and your close ones.
