PyCharm is a popular IDE – Integrated Development Environment used for programming for Python language. It offers a graphical debugger, code analysis, an integrated unit tester, and integration with version control systems. PyCharm also supports web development with Django. It offers cross-platform features, including Linux, Windows, and macOS.
Recommended Post: Best Linux Code Editor: Top 10 Reviewed and Compared
General Features
- Coding assistance and analysis with code completion, syntax, and error highlighting
- Project and code navigation
- Python refactoring
- Support for web frameworks
- Version control integration
PyCharm highlights:
- Data scientists can now define code cells in their files and choose exactly which parts to execute. No more need to re-import your data every time you finetune your analysis!
- Do you run Python code on remote machines? Configuring an SSH remote Python interpreter is now easier than ever.
- Those of you who take pride in having precise commits will be pleased to hear that you can now choose which chunks of files to include in your git commits.
- PyCharm is the Python IDE that knows your code, and PyCharm knows Python code better than ever with new code intelligence features.
- Docker Compose file format 3.3 and later are now supported. Also, the performance of Docker Compose interpreters has improved significantly.
How to Install on Ubuntu
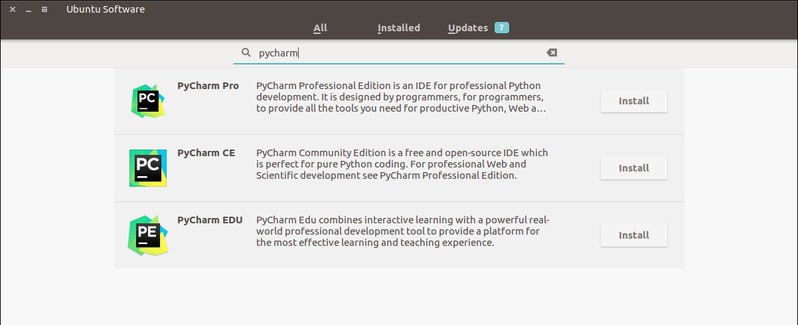
Method 1 – You can install it from the Ubuntu Software Center as it offers Snap Package installation.

Or you can also install it by running the following command into the Terminal:
sudo snap install pycharm-community --classic
For professionals, replace pycharm-community with pycharm-professional in the code.
How to Remove PyCharm
- For Snap Packages, you can remove it from the Ubuntu Software Center or run the following command:
sudo snap remove pycharm-community
Method 2 – Install this App in Ubuntu using umake
Umake is an amazing command-line tool that helps the developer install some important IDE. This IDE is also one of the development tools included in the umake. To install it through umake, you need first to use umake on your system. Normally, umake remains in the system by default, but in case it’s absent, run the following command to install umake via PPA:
sudo add-apt-repository ppa:ubuntu-desktop/ubuntu-make
sudo apt-get update
sudo apt-get install ubuntu-make
- Once umake is installed onto the system, install PyCharm community edition:
umake ide pycharm
- For PyCharm Professional Edition, run the below command:
umake ide pycharm-professional
Remove
umake -r ide pycharm
Method 3: Install in Ubuntu and Linux Mint using PPA
Now I will share the tutorial on how to install PyCharm on Ubuntu and other Ubuntu-based Linux distros using unofficial PPA. Before going to install PyCharm, make sure your system has Java installed.
- Add the unofficial PPA:
sudo add-apt-repository ppa:mystic-mirage/pycharm
sudo apt-get update
- Install the community edition of PyCharm:
sudo apt-get install pycharm-community
- Install the professional edition of PyCharm:
sudo apt-get install pycharm
Remove the Installation
- Uninstall the community edition of PyCharm:
sudo apt-get remove pycharm-community
- Uninstall the Professional edition of PyCharm:
sudo apt-get remove pycharm
- Remove the PPA from the sources list:
sudo add-apt-repository --remove ppa:mystic-mirage/pycharm
Notes: The features mentioned here are not all-inclusive. The features mentioned are compiled either from their respective official websites or from my personal experience using them.
PS: If you liked this post on how to install this Python IDE on Ubuntu, please share it with your friends through social networks or simply leave a reply below. Thanks.
Hello, the pycharm ppa you mentioned is obsolete – so install method #3 is not working
see also https://launchpad.net/~mystic-mirage/+archive/ubuntu/pycharm
Regards
Helmut