One of Linux’s ISO files’ best features lets you look at it before installing it on your machine. You can run a live test on your system; later, you can choose whether you want to install it.
This feature is helpful for test drives and can help recover your operating system if you accidentally remove or mess up with the GRUB bootloader. The GRUB is the short form of GNU GRand Unified Bootloader, commonly called GRUB bootloader.
If you have a Ubuntu live CD or a USB live stick, you can repair the GRUB bootloader and save your operating system.
Repair the GRUB Bootloader
The GRUB bootloader files are stored inside an EFI filesystem on a Linux system. You can damage your GRUB files in many ways. One of the major reasons for damaging the GRUB files is having multiple bootloader directories for different distributions and operating systems.
Using Ubuntu and Windows together in a dual boot system is commonly used very often. If you’re not conscious about partitioning the bootloader files for Windows and Ubuntu, you probably end up mismatching with the GRUB bootloader.
This post will show three different methods for repairing the GRUB bootloader using an Ubuntu Live USB drive.
Method 1: Repair GRUB Bootloader with Ubuntu Server Live Disk
Using an Ubuntu server ISO file to repair an Ubuntu desktop or server is clever because the ISO server file size is smaller than the desktop LTS file. It takes a short time to make a bootable file and is quick to boot.
Here, we will see how to use the Ubuntu server ISO file to recover and repair the GRUB bootloader file on Ubuntu Linux.
Step 1: Download the Ubuntu Server and Create A Bootable Disk
In the first step, you might need to download the ISO file of the Ubuntu server if you don’t have a live CD or a spare USB stick. You can click on this link to reach the server ISO file for downloading. When the download finishes, you use Ubuntu’s default Startup Disk Creator application to make a bootable USB disk.

If you’re using a Windows machine, you can use the UUI tool to make a Linux bootable file. It’s easy, and the steps are self-explanatory.

Step 2: Enter the Rescue Mode
After creating the bootable disk, insert it into your computer and power your system on. Then, you need to press the function key from the keyboard to select the bootloader menu. The boot menu function appears in the ESC or F9 key in most laptops and computers. You can find the boot menu key for your machine by googling it.

When the first boot screen appears, press the F6 button to enter the Expert mode. In the Expert mode, you can edit the boot options. To enter the broken image rescue mode, you need to write the following rescue value given below.
rescue/enable=true

When it boots successfully, you need to select the language, keyboard format, and other configurations to start with the live USB stick.

Step 3: Mount the Disk Partition
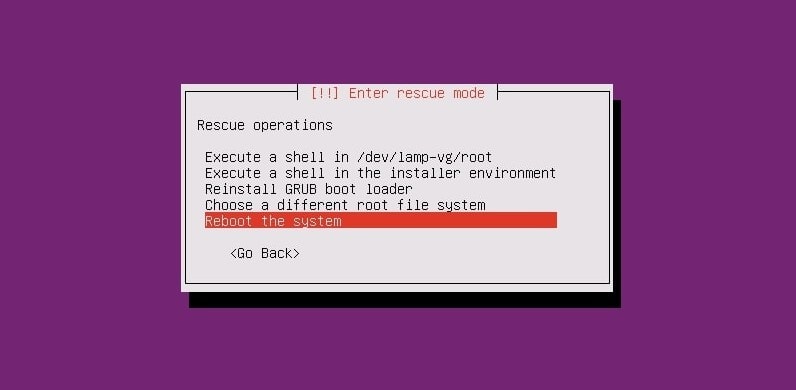
In this step, you will need to set the boot partition, mount the live disk, and rescue the GRUB loader. You can choose if you need to re-install the GRUB bootloader or if you just need to repair it with simple effort.

Step 4: Repair the GRUB Bootloader and Reboot
In this step, the drop-down menus will appear, and you can select options to repair and reinstall the GRUB bootloader on your Linux system. You might see this window again when the boot repair finishes rebooting your system. If you don’t need to reinstall the entire GRUB loader, you can select the first option to open a shell to run a few commands for boot repair.

When the shell appears, you can chronologically run the following command lines to repair the bootloader. Make sure you’ve replaced the sda with your own directory value.
# ls /dev/sd*
# grub-install /dev/sda
# exit

The GRUB bootloader won’t take very long; when the boot rescue finishes, you can reboot your system to get the GRUB bootloader back.
Method 2: Repair GRUB Bootloader Using A Desktop Live CD
Using a Ubuntu desktop ISO is similar to using the server ISO live USB stick. This method will use the latest Ubuntu ISO file and burn it to a USB drive. You can follow the steps shown previously to burn the ISO file.
Step 1: Try Ubuntu Live Session
After making the bootable USB stick, insert it into your computer and boot Ubuntu on your computer. Here, despite choosing the Install Ubuntu button, we will press the Try Ubuntu button to use Ubuntu as a live ISO file.
When the first startup page arrives, you will need to put the keyboard layout, time zone, and other related information to get started with Ubuntu Live.

Step 2: Install the GRUB Repair Tool
As we are using the live USB disk, we won’t require any root privileges to run the sudo commands. Now, make sure that you have an active internet connection on your computer. You can now use the following commands to install the GRUB bootloader repair tool on your system.
sudo apt-add-repository ppa:yannubuntu/boot-repair
sudo apt update
sudo apt install boot-repair -y
When the installation finishes, run the following command to open the boot repair tool. You can also find it on the top bar application menu.
boot-repair

Step 3: Repair the Bootloader on Ubuntu Linux
On the first screen of the GRUB boot repair tool, you will see the Main options, Grub Location, GRUB options, and other helpful tabs. In the Main options, you will find checkboxes to reinstall and repair the GRUB bootloader on your Ubuntu machine.

Use the EFI file to select the GRUB location if you have separate directories for root and GRUB files. If your system runs on an MBR partition, look inside the MBR options to see the MBR boot repair options. In the “Other Options tab”, you will find choices to rescue the bootloader files of Windows or other operating systems.

Now, to repair Ubuntu’s GRUB bootloader, select the ‘Main options’ and select ‘Reinstall GRUB’, then proceed with the Apply button. The entire process won’t take more than five minutes to complete. If your filesystem has additional partitioning errors, it will also detect and show you the issues.
Step 4: Reboot The System
After a successful GRUB bootloader repair, a ‘Boot successfully repaired’ message will appear on your screen. It will provide a URL where you will find all the information regarding the boot repair. You can now reboot and system and boot your system with the repaired GRUB bootloader.

Extra Tip: Use a Dedicated Boot Repair ISO
Till now, we have used a live CD/USB disk of the Ubuntu desktop/server to repair the GRUB bootloader. There are options to repair the bootloader with a dedicated GRUB bootloader ISO file. You can download the GRUB loader ISO file and make it bootable instead of using the desktop/server ISO file.

Final Words
In a multi-boot desktop arrangement, you need to be careful using the bootloader files. If you mess something up, you don’t need to install the entire OS again.
In the entire post, we’ve seen how to repair the GRUB bootloader on a Ubuntu machine. If you find this post useful and informative, please share it with your friends and the Linux community. You can also write your opinions on this post in the comment section.


Being an experienced Linux user, and using it as my main driver for so long (>15 years), I had to endure such issues mainly caused by Windows Update that was re-writing the boot record or otherwise the available boot options. I was using a more complex way to do it, as I again had to redo when Windows 11 screwed my ability to boot Linux Mint on my ASUS ROG laptop. Those tools described in the article will make life easier for everyone who suffers from those booting issues. I will also try them whenever Windows will decide it’s time to be the one and only OS on my laptop. Thanks for the article !!!!!
it works thank you absolute life saver
Used the Live USB method – 100% success. Thank you so much – went from sickening loss to elation!
Method 2 worked for me when Windows 10 didn’t want to boot from the GRUB menu. THANK YOU SO MUCH I SPENT HOURS LOOKING FOR SOLUTIONS! GOD BLESS YOU!!!!!!!!!!!!!!!!!!!!!!!!!!!!!!!!!
You have saved my life data <3 dont have words to thank you!
My brother, you are a legend…I bow
Great. Tips worked fine for me by using Linux mint xfce usb stick
I absolutely owe you my life right now – this boot-repair tool is a gem.
please fix the boot repair ppasto :
“`
# https://askubuntu.com/questions/165255/unable-to-install-boot-repair
sudo add-apt-repository ppa:yannubuntu/boot-repair
“`
Thanks so so much. You saved my life.
It worked and saved my time and precious data.
Thanks from ireland